Q: I want to record some songs from a cassette player to my computer, but the sound from the player almost does not have trebles, only tape/player hiss. I want the best possible sound, so what can I do?
A: Please read carefully. The videos are also available for download, in full HD (1080p), at the end of this page.
This text refers to preparing the cassette player for delivering the best possible sound quality to the computer audio input. A low quality sound is really hard to improve, sometimes impossible. We will cover here three steps that can significantly improve the sound. Not everyone will need to take the three steps, probably most people will need only one or two:
1) Head demagnetization - a magnetized head loses trebles and partially erases each tape it plays. However, this operation needs a demagnetizer, which not everyone has at home.
2) Head cleaning - a dirty head drastically reduces the trebles. Cleaning a dirty head is easy and makes an instant difference.
3) Head azimuth - if the tape was originally recorded by other equipment, the azimuth (alignment) difference can cause an extreme treble loss.
ACCESS TO THE HEADS
Not all cassette players offer the same ease of access to the heads. While in some models it's very simple, in other models it's necessary to remove a tape cover. But all players allow access to the heads, because cleaning and maintenance are often necessary. In our examples, we will use a 2-head (erase and rec/play) cassette player with frontal loading, which has a metallic tray for holding the tape and a cover that must be removed for proper access. This short video, which has no sound, shows how we remove the cover in our demonstration player. This is only an example to show you that this operation may be necessary: your player probably is different and may even have no cover:
Not all cassette players offer the same ease of access to the heads. While in some models it's very simple, in other models it's necessary to remove a tape cover. But all players allow access to the heads, because cleaning and maintenance are often necessary. In our examples, we will use a 2-head (erase and rec/play) cassette player with frontal loading, which has a metallic tray for holding the tape and a cover that must be removed for proper access. This short video, which has no sound, shows how we remove the cover in our demonstration player. This is only an example to show you that this operation may be necessary: your player probably is different and may even have no cover:
The open tray, without cover, allows access to the playback head. Please note: this text refers to preparing the cassette player for delivering the best possible sound quality to the computer audio input. Best sound does NOT necessarily mean original factory settings. For example, a tape that was recorded with wrong azimuth (alignment) needs a matching wrong azimuth to play with the best possible quality.
DEMAGNETIZATION
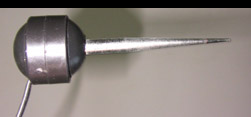
This is the step which makes less difference in the audio quality, but we have a good reason to mention it: a magnetized head will slowly and progressively erase your tapes. There are special tapes specifically made for this purpose, but here we will show the traditional way: using a demagnetizer. A demagnetizer is a very simple device, consisting on a coil and a metal core that generates a strong alternating magnetic field. This picture shows the demagnetizer that we used in the demonstration, but of course there are other models on the market, some of them with a very different look. Most important of all: when using this type of demagnetizer, the cassette player must be turned off.
DEMAGNETIZATION
This is the step which makes less difference in the audio quality, but we have a good reason to mention it: a magnetized head will slowly and progressively erase your tapes. There are special tapes specifically made for this purpose, but here we will show the traditional way: using a demagnetizer. A demagnetizer is a very simple device, consisting on a coil and a metal core that generates a strong alternating magnetic field. This picture shows the demagnetizer that we used in the demonstration, but of course there are other models on the market, some of them with a very different look. Most important of all: when using this type of demagnetizer, the cassette player must be turned off.
This short video (without sound) shows the demagnetizer in use. It's simple: with the player turned off and the demagnetizer turned on (plugged into an AC outlet), put the demagnetizer tip close to the playback head (but don't touch) and start a progressively broader circular motion, slowly increasing the distance between the tip of the demagnetizer and the head. Seems complicated? Watch the video and it will become simple:
Turn off the demagnetizer right after the end of the operation, to avoid coil overheating. Needless to say, be careful to keep magnetic tapes away from the demagnetizer, while in use - you can accidentally erase them.
HEAD CLEANING
Probably you have done this before. It's perhaps the most known way to preserve the audio quality in a cassette player. But even in this apparently simple procedure there are some important tips:
HEAD CLEANING
Probably you have done this before. It's perhaps the most known way to preserve the audio quality in a cassette player. But even in this apparently simple procedure there are some important tips:
This video does not have sound and shows the head being cleaned with a dry cloth:
•
Depending on your player, you may have to push Play in order to have easy access to the head. Most older players allow to do this without turning the player on. The player displayed in our example has logical circuits that do not allow this procedure, so in the example the cleaning is done with the head in its default (retracted) position.
•
Use the cotton in the same direction as the tape motion: horizontal, left to right. Never move the cotton in a direction other than the tape motion.
•
Never apply corrosive chemicals to the cotton before the cleaning (never accetone or similar). This will permanently damage the head. If you want to use some liquid, use one specifically created for this purpose, sold in a reliable store. Isopropyl alcohol is also ok, if you don't allow it to touch your skin, don't inhale it and don't smoke near the bottle. In our example, we use a dry cotton, which is completely safe and is also very effective (although not so effective as using specific liquids).
HEAD AZIMUTH
If the tape was recorded in a different cassette deck, there may be a misalignment that will result in a severe treble loss. Watch this movie with sound enabled and listen to the dramatic difference in trebles as the playback head aligment is adjusted to match the tape. This is not a simulation, this is real. Turn the sound on and listen to the difference.
PLEASE READ THIS: The purpose of the process described below is to show you how to match your cassette deck to the alignment of the other misaligned cassette deck that recorded your source tape. It is NOT a process to match the factory default alignment. To restore the standard alignment, use an alignment tape (best method) or a tape that you recorded before changing the alignment. ALWAYS RESTORE THE CORRECT (OR AT LEAST THE PREVIOUS) ALIGNMENT AFTER DOING THIS.
When you record from a misaligned source, you cannot recover the lost trebles later by software. This third step shows how to adjust the playback head in order it has exactly the same alignment that was used to record the tape, therefore giving the best possible trebles. This step can improve the sound only if the tape was recorded in other equipment (including pre-recorded tapes purchased in stores).
If your cassette deck has only two heads (does not have a third head specifically for recording), we strongly suggest to record a reference tape before continuing. Record a reference song with many trebles (hi hats, plates, instruments with high frequency trebles). Do this only once and keep the reference tape. This way, you can always reverse the rec/play head to its previous alignment, by using the reference tape. Remember that when you change the alignement of a playback head that is also used to record, like in 2-head decks, the newly recorded tapes will have the new alignment, so if you plan to use the cassette deck for future recordings, it's very important to restore the original head alignment. If you have a 3-head deck (separated record and playback heads) you don't need a reference tape, as in such cassette deck you won't change the record head alignment, you will change the playback head alignment only.
If your cassette deck has only two heads (does not have a third head specifically for recording), we strongly suggest to record a reference tape before continuing. Record a reference song with many trebles (hi hats, plates, instruments with high frequency trebles). Do this only once and keep the reference tape. This way, you can always reverse the rec/play head to its previous alignment, by using the reference tape. Remember that when you change the alignement of a playback head that is also used to record, like in 2-head decks, the newly recorded tapes will have the new alignment, so if you plan to use the cassette deck for future recordings, it's very important to restore the original head alignment. If you have a 3-head deck (separated record and playback heads) you don't need a reference tape, as in such cassette deck you won't change the record head alignment, you will change the playback head alignment only.
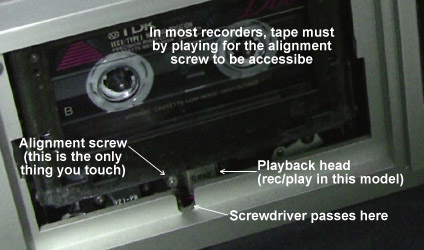
In this picture you see the alignment screw in more detail. It is a fragile screw, so you must be careful: don't turn it excessively clockwise (in other words, don't tighten it too much), or you will permanently damage it. And don't turn it excessively counter clockwise or you will release the head - no damage, but it may be hard work to put it in place again.

About the screwdriver: be careful to choose the correct size, or you can damage the alignment screw. In our example, the alignment screw accepts two sizes, so we chose the smallest tool in order to give more visibility in the video.
NEVER touch the front of the playback head (the point which contacts the tape) with the screwdriver! The screwdriver is for the alignment screw only.
NEVER touch the front of the playback head (the point which contacts the tape) with the screwdriver! The screwdriver is for the alignment screw only.
The alignment is done exactly as displayed in the video:
•
With the tape cover already removed, put the tape in the player case and push the Play button.
•
While the tape is playing, use te screwdriver to gently rotate the alignment screw clockwise or counter clockwise, until the sound has maximum clarity and best trebles.
•
That's all. You can record the tape.
Now some very important notes:
1. The head azimuth alignment process described here is "by ear". We must inform you that there are alignment tapes in the market, created specifically for adjusting playback/record head azimuth. In such professional context, a measure instrument, like an oscilloscope, is also required. If a recording head is not correctly aligned, tapes recorded in that equipment will lose trebles when played in other equipments. However, a commercial (and very expensive) alignment tape would help nothing here, because our problem is how to play a tape that was recorded with wrong alignment, with the only purpose of transferring its contents to a computer. So our intention here is to give you a way of getting the best possible quality without spending a single extra penny. All you need is a screwdriver, good ears and some patience.
2. The purpose of the alignment adjust process described here is to show you how to match your cassette deck to the alignment of the original equipment that recorded the tape that you want to play (and record to your computer), giving the best possible sound, but not necessarily matching the "standard" (factory default) alignment. To restore the alignment to its original factory default, use the reference tape that you created before changing the alignment, as described above.
VIDEOS - DOWNLOAD
When your browser saves a web page, it saves the text and perhaps the pictures, but not the videos. Same happens if you print this page. For this reason, you can download the videos from the links below, in wmv full high definition format (1920x1080). Only the last video (alignment) has sound. They are zipped to prevent Media Player from launching instead of saving your downloads.
When your browser saves a web page, it saves the text and perhaps the pictures, but not the videos. Same happens if you print this page. For this reason, you can download the videos from the links below, in wmv full high definition format (1920x1080). Only the last video (alignment) has sound. They are zipped to prevent Media Player from launching instead of saving your downloads.
RemoveCover1920x1080.zip 2,225 KB
Demag1920x1080.zip 2,164 KB
Cleaning1920x1080.zip 1,550 KB
Align1920x1080.zip 3,489 KB
Demag1920x1080.zip 2,164 KB
Cleaning1920x1080.zip 1,550 KB
Align1920x1080.zip 3,489 KB
Frequently Asked Questions